Get started with your Combustion Tools
-
Basic setup: 5 min per tool (or less)
Done with setup already? Jump to "Cooking with the Predictive Thermometer"Don't panic! There's lots of text on this page describing a process that's head-scratchingly simple.
Complete instructions just below.
-
Giant Grill Gauge installation + setup
Full setup guide with video walkthrough -
WiFi setup: 3 min per tool (roughly)
To connect to WiFi and MeatNet™ Cloud, you'll need at least one of the following:
- WiFi Booster
- WiFi Display
- Giant Grill Gauge
- Secondary mobile device running the Combustion App
Full instructions for WiFi setup are below the basic setup instructions. The first step is "Set up your thermometer for cloud access."
open the text drawers to sup on the intelligence inside
Basic Setup (full instructions)
2. Charge your tools (all of them)
Please charge your thermometer or other Combustion tools fully before applying a firmware update.
How long for a full charge?
- Thermometer: 25 min
- Display: 90 min
- WiFi Display: 90 min
- Booster: 60 min
- WiFi Booster: 60 min
- Giant Grill Gauge: 90 min
A thermometer is fully charged when the light on the (powered/plugged in) cradle or Booster turns green.
If the Booster is unplugged, press the button on the Booster - if it turns green with the thermometer inside, the thermometer is charged.
3. Update your firmware (all of it)
IMPORTANT: Enable Bluetooth when installing the app.
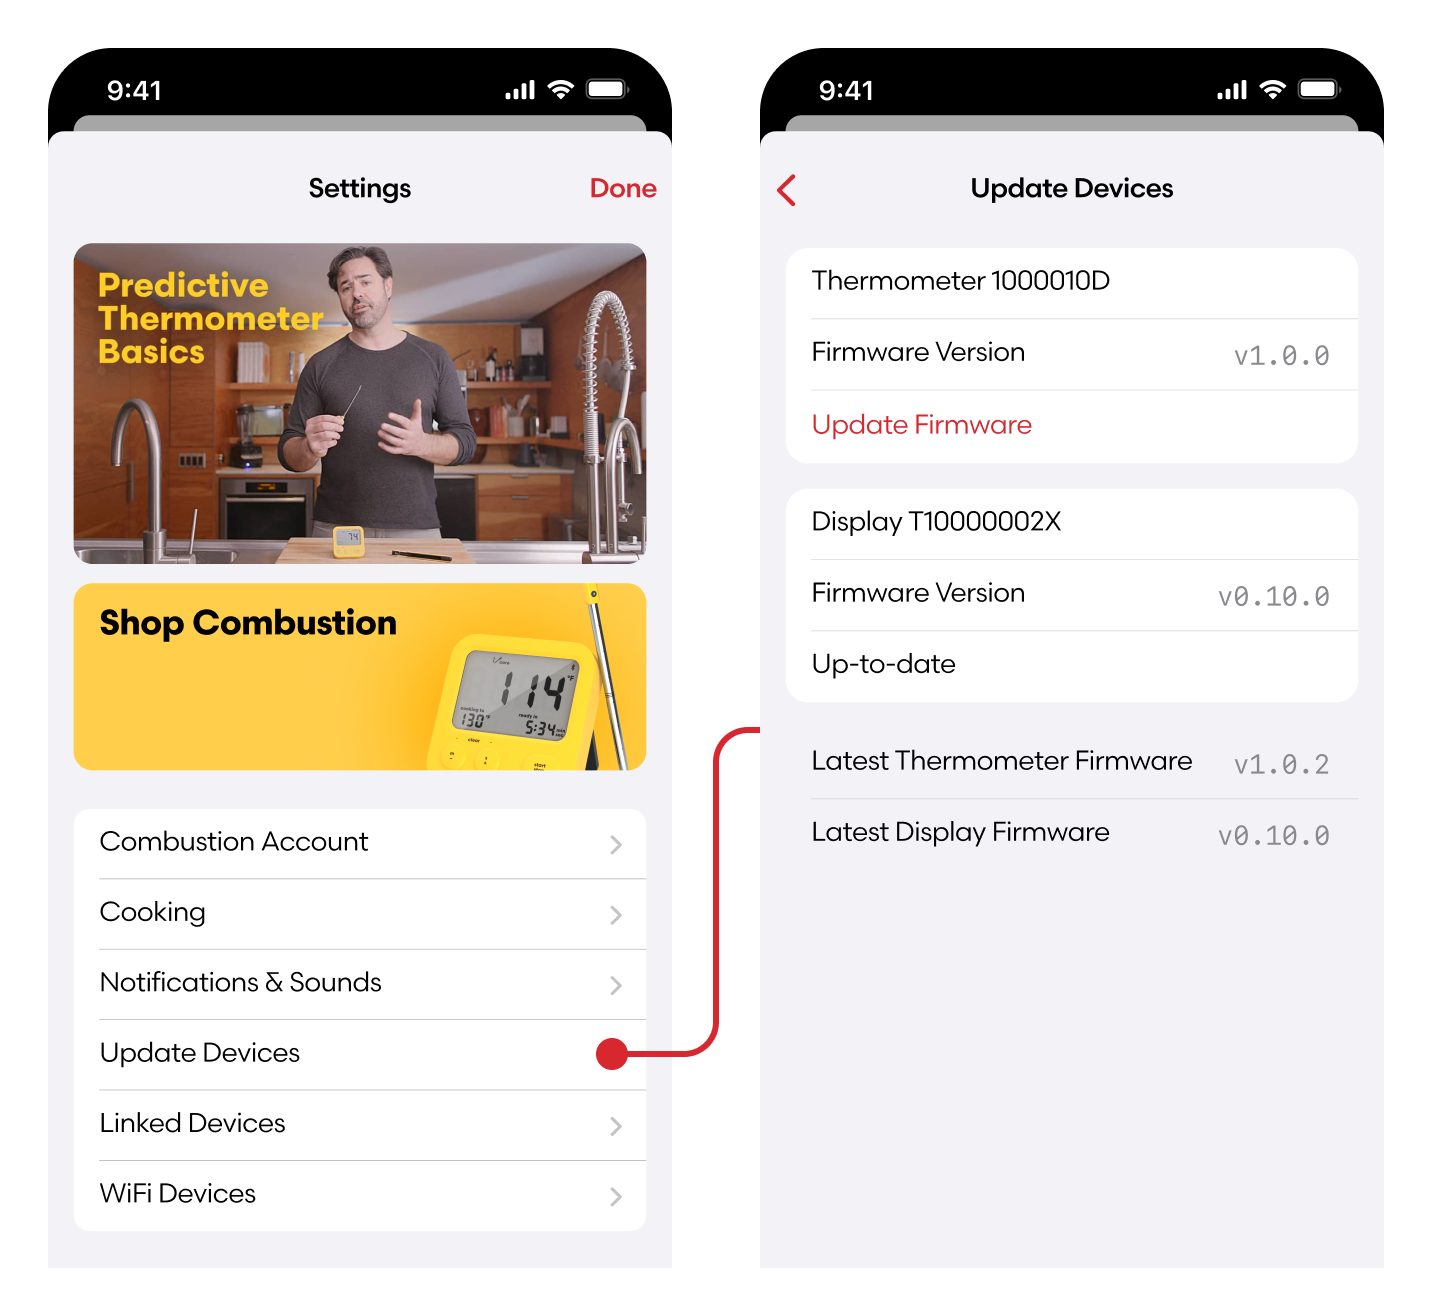
To update your firmware, tap settings in the app, then select "update devices."
You'll need to remove your thermometer from its charger/Booster - this turns it on.
Update your Combustion Tools one at a time! It’s best to power off all the tools you are not currently updating.
Then: choose the tool you want to update and tap the update button.
After updating firmware on the Predictive Thermometer, please recharge it (updating uses a lot of battery).
Collapsible content
4. Now recharge your tools
Updating firmware is exhausting! Be sure to recharge your tools fully before you start cooking.
those little arrows open buckets of info
Set up your thermometer for cloud access
1. Link app to thermometer
- Install/update the Combustion app on one (or more) mobile devices
- Follow in-app instructions for linking Combustion Predictive Thermometers (CPTs) to your account
- Look for the “link this device” button
- Follow the instructions to link
- Link all of your Predictive Thermometers to your device
2. Set up your MeatNet Cloud account
- In the app, tap settings
- Tap "Combustion Account"
- You can sign in with email (+password), Google ID, or Apple ID* (*on Apple/iOS devices only)
- If this is your first time using MeatNet Cloud, you will receive a verification link in your inbox. Click/tap through and get verified!
- Once you’ve set up your Cloud account, the list of “linked” Predictive Thermometers gets synched to any mobile device using that account
BTW, this is a new Combustion account - you may have another one that is only used for shopping purposes.
That account does not share credentials (or anything) with MeatNet. It is not managed by Combustion Inc -- it's part of Shopify (the online shopping platform we use).
Joining Combustion tools to WiFi
-
1. Prerequisite set-up
Before you do Wifi, did you do this?
-
For Boosters:
With the Combustion app open, remove the thermometer from the Booster, and turn the Booster on. Make sure your Booster is blinking a single white blink.
-
For Displays:
With the Combustion app open, turn on your Display and remove your thermometer from its charger. Make sure the Display is showing the thermometer’s temperature.
-
2. Open Combustion mobile app settings and navigate to 'WiFi Devices'
-
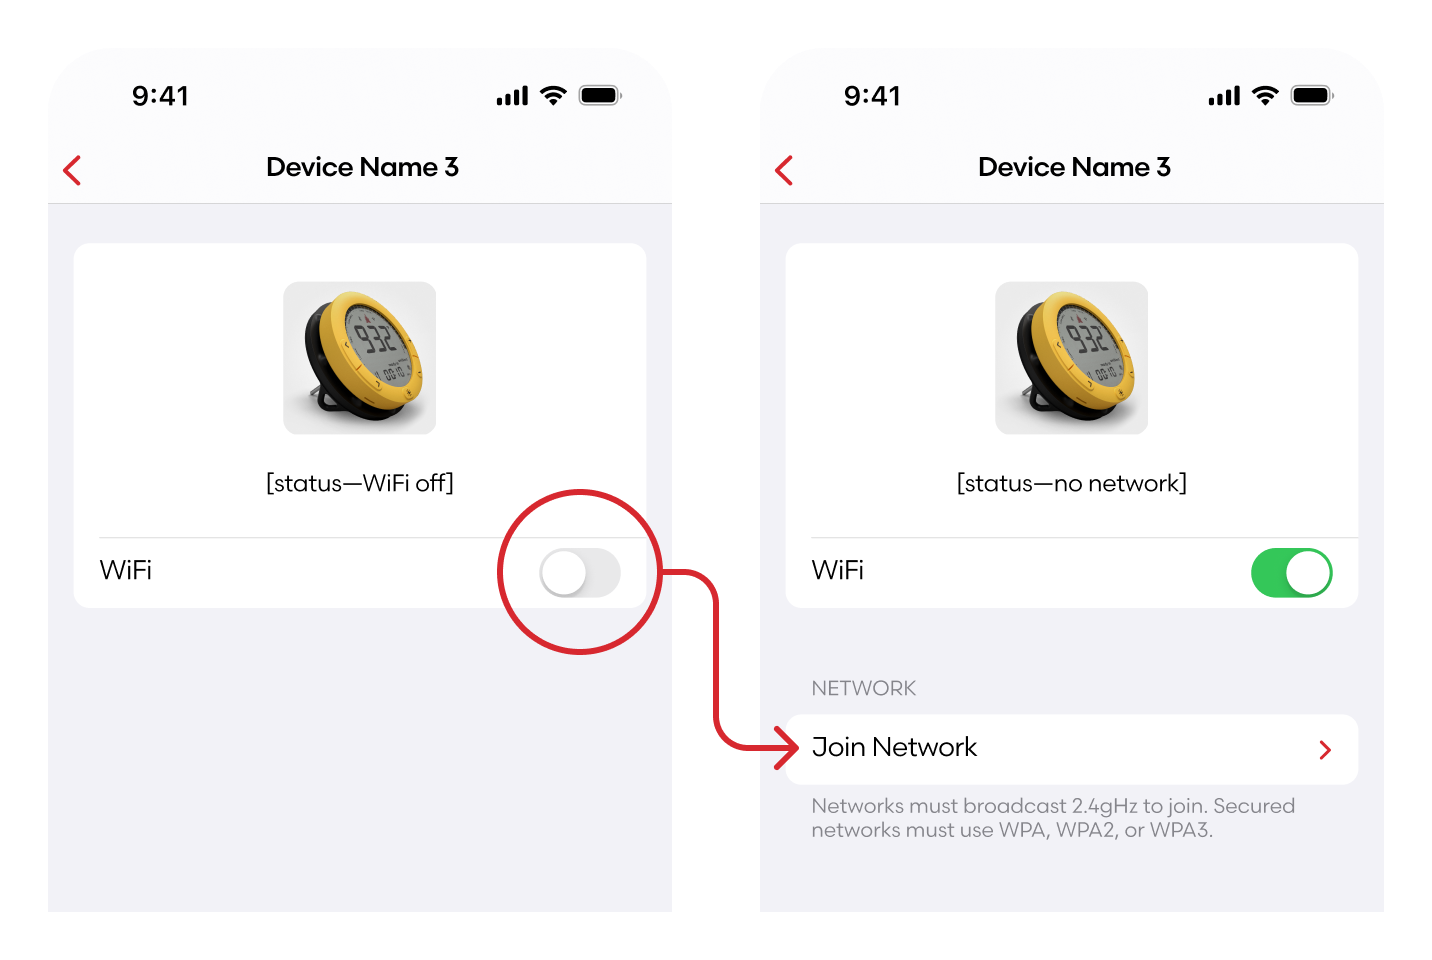
3. Select the tool you’d like to join to WiFi, then select Join Network.
Ensure that the tool’s WiFi is enabled by selecting the WiFi switch.Then, select Join Network to see all the available WiFi networks.
-

4. Select your desired WiFi network and enter your network credentials.
If your network is unlisted, select ‘Other...’ from the network list to join it manually. Pulling down on this page will refresh the list of networks manually, but remember: scanning for networks is power-intensive for the tool’s battery.
-
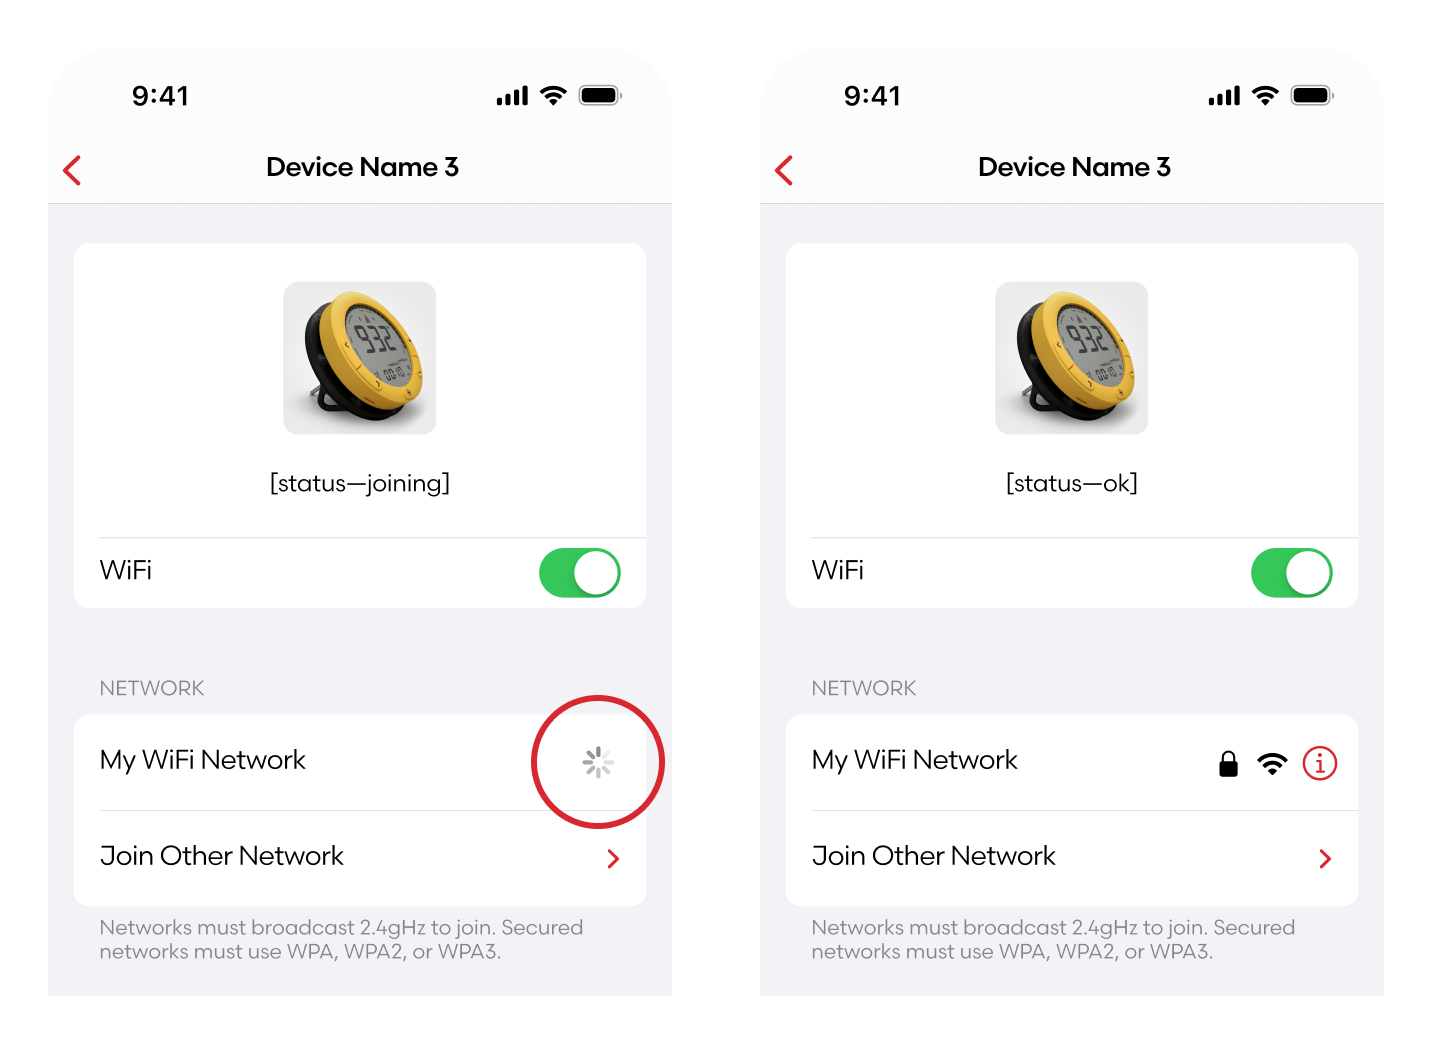
5. Joining is complete when the device displays its signal strength.
Joining is indicated by the waiting “spinner” displayed next to the network name. When successfully joined, the signal strength will appear next to the network name instead.
-

Help, I can’t join my network!
Basic router/wifi troubleshootingTo join, networks must broadcast 2.4 gHz to join. Secured networks must use WPA, WPA2, or WPA3.
Be sure that you are signed in to MeatNet Cloud and that you verified your email (if you are using email ID). If not, you may see weird/misleading error messages coming from your router.
Cooking with the Predictive Thermometer
-

Instant Read Mode
The Predictive Thermometer wakes up in Instant Read mode. Turn it on by removing it from the charger or Booster.
It takes 3-4 seconds to accurately report the temperature at sensor T1 (the pointy end).
Instant read turns off when you set a target temp on the Display or app (Predictive Cooking Mode).
The instant read temperature is not always the same as the “TrueCore” temp.
Core temp is determined after you set a target temp - it's the lowest reading from the 4 sensors below the minimum insertion line (see illustration above).
-

Predictive Cooking (with Display)
Insert the Predictive Thermometer to at least the min line (shown above).
Press m- and s+ buttons to set the “cooking to” temperature.
Press “start” – the "cooking to" temp will stop blinking.
Apply heat (oven, smoker, grill, frying pan, etc… you get the idea).
The Display shows progress by indicating % of cooking completed.
At about 33% a countdown will appear: “ready in.” That’s the prediction!
When that number hits 00:00, an alarm will sound to let you know your food is ready.
Enjoy!
-
Predictive Cooking (with App)
Insert the Predictive Thermometer to at least the min line (deeper is preferred).
Tap "predict" on the main screen.
Set your temp, then tap "begin prediction."
Then follow the same steps as above.
To choose between Cº and Fº: tap the three dots (right edge of the app, near ready in).
-
Learn by watching, then by doing
Learn by watching!Follow the below link for simple video recipes/demos featuring:
- Steak
- Salmon
- Roast Chicken
Plus cooking demos for some holiday faves:
- Beef Wellington
- Roast Turkey
- Prime Rib
(Note: these videos were produced using a 1st Gen Predictive Thermometer, but that doesn't change the instructions or technique even slightly. Enjoy!)
Advanced Features
SafeCook™ - for food that is both safe and delicious
The Combustion App controls our one of a kind onboard food safety tracker (SafeCook™).
SafeCook runs in parallel and completely independent from the “ready-in” target temp prediction.
Setting your target temp higher or lower DOES NOT affect SafeCook.
You can set your target temp (“predict”) before or after setting SafeCook.
How to use SafeCook:
- Turn on your Predictive Thermometer
- Open the Combustion App (and be sure Bluetooth is enabled)
- Tap “Predict” and set your target temp for perfect doneness
- Where it says “Safeguard this cook with SafeCook” tap “Add”
- Toggle SafeCook on (the toggle will turn red)
- Choose your meat type (the default is “Poultry”)
- Choose the form that best describes your prep (for instance “intact cut” for a steak)
- Tap “apply”
- This activates SafeCook
- When your food is safe*, your app will display a green SafeCook badge
*According to USDA/FDA/FSIS standards combining time and temperature.
The complete documentation is nearly 800 pages.
Read the in-depth instructions to really understand how SafeCook works!
Local MeatNet and MeatNet Cloud
MeatNet™ is an ad-hoc mesh network.
It’s a network that forms itself and doesn’t require any intervention - you don’t have to have an access point… or router.
MeatNet™ Cloud connects all this to the internet, so you can live-stream your data to wherever you are.
Combustion tools (and the app) communicate directly with one another (peer-to-peer).
Because of the vital data and calculations are done inside the thermometer (no kidding!), breaking a connection does not interrupt an ongoing cook or reset anything.
With MeatNet, if your phone (for instance) has to reboot mid-cook, no problem. Everything will pick up–live and in real-time–when you get back.
More?
- All data originates inside the Predictive Thermometer
- The thermometer broadcasts this openly over Bluetooth
- Some products (e.g. Combustion Display and Combustion Booster) include a “repeater” function or repeater AND WiFi
- A repeater rebroadcasts the exact information it got from the Predictive Thermometer
- Apps within range of any MeatNet device display the data
If you went through the setup steps (higher on this page), your personal MeatNet and cloud connection are ready when you are.
Connecting multiple tools over Bluetooth (multi-node/mesh)
To share signals correctly, all of the Combustion Tools involved must be linked.
Start by updating the firmware on all devices* (if you haven't yet).
Then do this:
- Put Thermometers in Boosters (this turns the Booster radio off) and turn off Display (hold start/stop)
- Put all devices within a couple inches of each other ("cuddle pile")
- Remove Thermometers from Boosters and turn on Display, and set Thermometers in the pile of devices
- Let all devices sit for 1-2 minutes
- That's it! They're all linked together and will relay signals from all linked Thermometers
- Each Booster can be linked to up to four Thermometers
⚠️ Yes, this works with multiple Boosters, with or without a Display.
Graphing with the Combustion App
Graphs will only appear when a thermometer is on and connected to the app.
- If the graph is not visible, tap one of the temperatures. Voila!
- To hide the graph, tap the settings icon (three vertical dots) and select "hide graph."
- To show/hide the lines from any sensor, tap the color-coded circle below the temp.
There are more advanced settings within the app itself. Play around!
Advanced Mode
View (and graph) temps from all 8 sensors using Advanced Mode.
- You'll find advanced mode in the settings menu.
- You can toggle each sensor's display on/off by tapping the color-coded circle beneath each sensor.
- Sensors are labeled from T1 (closest to the tip) to Ambient/T8 (the handle sensor).
Debug Mode
Inside the settings menu (three vertical dots), you can find debug mode. There's a lot of confusing stuff in there!*
But if you're having trouble with one of your tools, or the network, you may find some answers.
*If you're an engineer, you'll probably love it.
If you're curious - signal strength is shown as a negative number (dBm). For reference:
-50 is fantastic
-80 is OK
-90 is marginal
And so on.
Watchouts + Warnings
Watch out for non-standard chargers
Combustion tools can be charged using standard (5v) USB ports and most USB hub-type products.
If in doubt, a phone charger is a safe bet.
Do not use a “quick charge” port or any other USB port that uses nonstandard voltage. It’s complex, but essentially these types of chargers are relying on the device to tell them how much voltage/amperage to deliver.
The circuitry in “smart chargers” should default to the 5v standard but sometimes they don’t. The industry is a bit unregulated, at least in the US.
Although most quick-charge ports and “smart” charging stations are safe for Predictive Thermometers, we cannot guarantee that. In other words, it’s probably fine (and I’ve done it myself) but it’s at your own risk.
A special note: Thermoworks has a VERY nonstandard charger for one of its products that delivers 12v of power.
Do not use that to charge any of our tools, or anything else – other than the thing it comes with. It will destroy anything else you plug into it, with a vengeance.
Never microwave!
First off, you should never microwave metal. It will create arcs and potentially destroy your microwave, voiding the warranty on anything and everyone around.
Secondly, NEVER EVER MICROWAVE THE PREDICTIVE THERMOMETER.
Not only is it largely metal, it’s antenna is specifically tuned to the wavelength of a microwave (Bluetooth is the same length).
As a consequence, it’s even more dangerous than microwaving a spoon (for instance).
One word: plasma.
A microwave (or trivection oven) also has a fine mesh screen that stops the microwaves from cooking things in the vicinity, like butter keepers, faces, parakeets, etc. This screen is a highly effective Bluetooth signal blocker.
Even if you’re not using the microwave function, it will be extremely difficult to get a good signal out of an oven that has microwave capability.
The only exit in that scenario is the oven’s vent holes (typically behind the range) - you may be able to get a signal out if you place a Booster or Display there.
Do not quench!
One non-obvious thing to watch out for is quenching. Don’t do it!
Although the Predictive Thermometer (including the handle) is very durable, it’s not quite indestructible.
Quenching is putting a hot thermometer directly into cold water. The shock of the temperature change can cause the handle to crack or shatter.
The same thing will happen with a pyrex dish or ceramic bakeware. Don’t quench those things either.
Since you asked, a metal pan can also become disfigured or warped by quenching (it’ll show up as a hump in the middle; not good!).
In general, there’s no kitchen item that enjoys quenching, although some items are tolerant.
It’s fine to soak the thermometer to remove stuck-on food, but always wait until it has cooled (ideally to room temp) before doing so.
Putting it in the fridge directly after cooking is not risky. The temp transfer is magnitudes slower.
Do not exceed 900ºF/482ºC
Extreme temperatures can damage the internal electronics and sensors.
Keep the lower sensors (below the minimum insertion line) under the safe limit of 220ºF (105ºC). This is easily done if all lower sensors are inside the food - the water in the food keeps the temperature at or below boiling.
Quick reference
How does SafeCook™ work?
The Combustion App tells you when your food is safe to eat, applying the food-safety standards of the US government (USDA/FDA).
TLDR: with the Predictive Thermometer, you can cook safely without overcooking your food.
The SafeCook feature is very easy to use and the Predictive Thermometer does all the math.
With it, you never have to overcook anything “just to be sure.”
Select your protein + preparation.
SafeCook tracks combined time-and-temps as your food heats up. It's a rolling count of bacterial destruction.
Using time + temp is just as effective as reaching a very high temp (and far tastier!).
Cooking at 150ºF for 4.2 min is just as effective as cooking to 165ºF.
Either method eliminates bacteria by the millions (99.99999% is the USDA-safe level for chicken).
How to manage resting + carryover?
We don't recommend resting for most things, but there are some times when it's very useful.
If you plan to rest your food, set the target temp lower to compensate and leave the thermometer in. That way you'll know exactly when to slice and quickly cool your food if it's in danger of going too high.
Carryover effects can vary greatly (depending on temperature differential, water content, mass, and surface area), but they are repeatable with the same cut and same cooking plan.
Keep track! You might not nail it on the first try, but with the Predictive Thermometer you can tune it in.
What temp do you recommend for steak...chicken... loaf...etc?
It's really up to you! It's a matter of taste.
Listing preferred cooking temps would require a huge page of its own (or maybe a whole site), but here are some of the temps we personally use:
- Salmon: 120ºF/49ºC
- Steak (med rare): 128ºF/54ºC
- Steak - ribeye: 137ºF/58ºC
- Pork chop (med rare): 140ºF/60ºC
- Hamburger (med): 140ºF/60ºC
- Chicken (breast): 150ºF/65ºC (for 3 minutes+)
- Bread: 207ºF/97ºC
Cook below USDA food safety standards (just like every pro chef does!) at your own risk.
User guides and handy reference
Go to the 1st Gen start page for video walkthroughs that cover the basics of how each tool works (does not include WiFi).
Want to see some examples of how to cook with the Predictive Thermometer? Great! Here you'll find the basics:
- Simple and juicy Roast Chicken
- Reverse-seared Steak
- Crispy pan-roasted Salmon
Plus these holiday favorites:
- Beef Wellington
- Roast Turkey
- Rib Roast
For details on setting up MeatNet™ with multiple repeaters (Boosters + Displays of any generation), check the Booster Guide.
To understand the advanced features on the Combustion App, go to the App Guide.
Product-specific setup guides (including Giant Grill Gauge)
Want a more detail on a specific product? Go to one of these expanded product setup pages.
Setup is exactly the same between 1st and 2nd gen. They use the same software!
The big differences are in the hardware, mostly improved radio/antenna signal, battery life, and superior heat-tolerance.
Also the 2nd Gen Display is louder.
There's more on the help center/FAQ
We have a pretty sweet encyclopedia of knowledge in the Help Center/FAQ.
Searchable by topic!
You'll find all the various reference guides as well as deeper answers to a wider variety of questions.
For instance:
What do the buttons on the Display do?
How exactly should I insert the thermometer into my roast?
And many more.
If you don't find what you're looking for, support@combustion.inc is here to help.


